+44 (0)800 002 9559 / +44 (0)1273 413489 info@bikeadventures.co.uk

cycling injuries

End of Season? – Five turbo sessions to try.

By in Sports & Fitness Comments Off on End of Season? – Five turbo sessions to try.

With advances in sports science and testing many of the old rules we have come to rely on for performance development may no longer apply.

Science laboratories and sports institutes around the world are publishing new research daily questioning the relevance of existing theories.

Among the most common of these is the relevance of long training rides. Whilst they have a place in any training regime they are no longer to be considered in isolation, more miles doesn’t necessarily mean better performance. Psychological milestones, the 100 club for example, are relevant targets for motivation but have limited physiological effect.

It has been proven however that 20 minute high intensity intervals i.e. above 90% effort help to develop anaerobic capacity (the maximal point at which adenosine triphosphate (lactic acid) can be resynthesized by the body) by as much as 28% where moderate intensity long miles will not. Continuing from this max efforts (100%) of 20 to 60 secs will develop vo2 Max (your body’s ability to absorb, distribute and utilise oxygen).

These intervals can be added into road sessions but are more commonly used during indoor training sessions on turbo trainers or in spinning classes.

To discover more on the relevance of high intensity training and its relevance in cycle performance take a look at British Cycling’s Insight Zone.

With the autumn and winter upon us now is the time to think about indoor training to support your Bike Adventures trip. Listed below are 5 Turbo Training sessions to mix things up. Try to add one or two sessions a week to compliment your road riding.

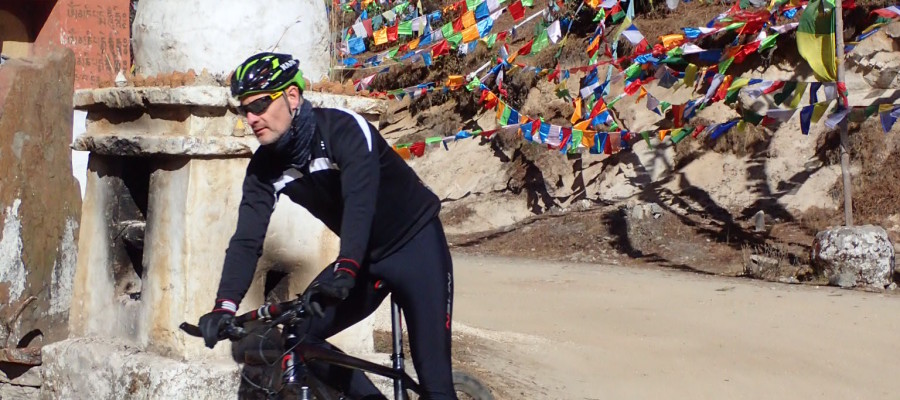
If you are off to Bhutan this autumn with Bike Adventure’s on their Mountain Bike trip I will see you there. I need to get on the turbo!


NOTES TO AID TURBO SESSIONS

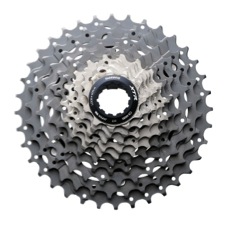
Rear cassettes come in numerous forms (9/10/11 rings) of differing teeth ratios, the sessions below are based on 10 ring cassettes but can be adapted to match your setup. Always use the larger ring as your start point for warm up and progress from there.

Bike cogs

It is more appropriate to manage turbo sessions by RPE (rate of perceived effort) and specifically % MHR (percentage of maximum heart rate) where possible.

Maximum heart rate can be approximated using the calculation 220 – Age = MHR. However more accurate results can be achieved through specific heart rate or vo2 testing.

FOR YOUR GUIDANCE:

TRAINING ZONE


%MHR

RPE

RECOVERY


<60%

0-1 EXTREMELY EASY

ZONE 1:

BASIC ENDURANCE

60-65%

1 VERY EASY

ZONE 2:

ENDURANCE

65-75%

2 QUITE EASY

ZONE 3:

TEMPO

75-82%

3-4 MODERATE

ZONE 4:

THRESHOLD

82-89%

5-6 HARD

ZONE 5:

VO2 MAX

89-94%

7-8 VERY HARD

ZONE 6:

NEUROMUSCULAR

94-100%

9-10 EXTREMELY HARD

 THE TURBO SESSIONS DETAILED BELOW SHOULD BE FOLLOWED AS CLOSELY AS POSSIBLE BUT YOU MUST TAKE INTO CONSIDERATION YOUR HEART RATE RECOVERY, YOU MAY NOT ALWAYS REACH THE TARGETS SET HIGH OR LOW. MAKE ADJUSTMENTS TO ACCOMMODATE YOUR ABILITY.

Turbo Cycling trainer

TURBO 1 – PROGRESSIVE GEARS

Progressive Strength and resistance session – Hill Simulation – Cadence 90rpm – Effort 60 to 90% progressive

12 min – Ring 1 (Largest)

60%

ZONE 1

11 min – Ring 2


10 Min – Ring 3


9 Min – Ring 4


8 Min – Ring 5

PROGRESSING TO


7 Min – Ring 6


6 Min – Ring 7


5 Min – Ring 8


4 Min – Ring 9


3 Min – Ring 10        

90%

ZONE 5

5 Min Recovery – Ring 1


 75 Min Total (this session can be simply progressed by increasing the start minutes and decreasing accordingly with ring change)


TURBO 2 – MINUTE MADNESS

High intensity sprint intervals – Cadence 90rpm – Effort maximal at interval

5 Min – Ring 1 (Largest)

Warm up

65%

ZONE 1

5 Min – Ring 2                  

Warm up

70%   

ZONE 2

5 Min – Ring 4                

Warm up

75%   

ZONE 2


2 Min – Ring 5

Recovery

75%   

ZONE 3

1 Min – Ring 10 (Smallest)

INTERVAL MAX EFFORT

100%

ZONE 6

Repeat 10 times


5 Min – Ring 4                    

Cool Down

75%

ZONE 2

5 Min – Ring 2    

Cool Down

70%

ZONE 2

5 Min – Ring 1 (Largest)  

Cool Down

65%

ZONE 1

 60 Min Total (to increase the intensity of this session simply change the warm up and cool down rings accordingly)


TURBO 3 – SIT/STAND

High resistance technique intervals – Cadence 90rpm – Effort maximal at interval

5 Min – Ring 1 (Largest)    

Warm up

65%   

ZONE 1

5 Min – Ring 2                    

Warm up       

70%

ZONE 2

5 Min – Ring 4                     

Warm up       

75%   

ZONE 2


1 Min – Ring 10 (Smallest) – standing

85%   

ZONE 4

1 Min – Ring 8 – seated – INTERVAL MAX EFFORT

100%

ZONE 1

1 Min – Ring 5 – Recovery   

75%

ZONE 3

Repeat 10 times


5 Min – Ring 4                     

Cool Down    

75%   

ZONE 2

5 Min – Ring 2                    

Cool Down     

70%

ZONE 2

5 Min – Ring 1 (Largest)    

Cool Down

65%   

ZONE 1

60 Min Total (to increase the intensity of this session simply change the warm up and cool down rings accordingly)


TURBO 4 – AEROBIC

Progressive aerobic intervals – Cadence 90rpm – Efforts at % Max Heart Rate

10 Min – Ring 1 (Largest) Warm up

65%

ZONE 1


2 Min – Ring 6                                               

Progress to 70%

ZONE 2

6 Min – Ring 6

Hold at 70%

ZONE 2

2 Min – Ring 7

Progress to 75%

ZONE 3

6 Min – Ring 7

Hold at 75%

ZONE 3

6 Min – Ring 8                                              

Hold at 80%

ZONE 4

Repeat 3 times


2 Min – Ring 4 – Recovery                           

65%

ZONE 1


90 Min Total (to increase the intensity of this session simply increase the times of the held efforts)


TURBO 5 – RUSSIAN STEPS

High Intensity short intervals – Cadence 90rpm – Maximal Efforts

5 Min – Ring 1 (Largest)    

Warm up

65%   

ZONE 1

5 Min – Ring 2                    

Warm up       

70%

ZONE 2

5 Min – Ring 4                     

Warm up       

75%   

ZONE 2


15 Sec Max Effort / 45 Sec Recovery Spin – Ring 9

100% / 75%

ZONE 6 / ZONE 3

20 Sec Max Effort / 40 Sec Recovery Spin – Ring 9

100% / 75%

ZONE 6 / ZONE 3

25 Sec Max Effort / 35 Sec Recovery Spin – Ring 9

100% / 75%

ZONE 6 / ZONE 3

30 Sec Max Effort / 30 Sec Recovery Spin – Ring 9

100% / 75%

ZONE 6 / ZONE 3

35 Sec Max Effort / 25 Sec Recovery Spin – Ring 9

100% / 75%

ZONE 6 / ZONE 3

40 Sec Max Effort / 20 Sec Recovery Spin – Ring 9

100% / 75%

ZONE 6 / ZONE 3

45 Sec Max Effort / 15 Sec Recovery Spin – Ring 9

100% / 75%

ZONE 6 / ZONE 3

7 Min – Ring 4 – Spin recovery to allow for maximal effort

70%

ZONE 2

Repeat 2 times


5 Min – Ring 4          

Cool Down

75%   

ZONE 2

5 Min – Ring 2                    

Cool Down    

70%

ZONE 2

5 Min – Ring 1 (Largest)    

Cool Down    

65%   

ZONE 1

 58 Min Total (to increase the intensity of this session simply add additional Russian steps)

The core to cycling.

By in Cycling challenge, Sports & Fitness Comments Off on The core to cycling.

A stronger core can help improve your cycling.

Core MusclesThis is an undisputed fact, but why is it that many cyclists only concentrate on working their leg muscles? Often it is because they don’t really understand the relevance of a strong core in relation to cycling; either that or it’s a time issue.

For cycling you need power (i.e. the production of watts). Power is an integral part of cycling and strength is the main component of power. When we say strength, we don’t mean bulking up to look like a muscle-bound meathead, we mean lean and strong.

Even amazing leg strength is not enough, as without a strong stable core you will not be able to properly utilise that strength. This quote from Graeme Street sums this up perfectly – ‘It’s like having the body of Ferrari with a Fiat chassis underneath’.

So now that we have established that a strong core is essential for great cycling, surely we should understand the reasons why? Having a solid core will help reduce unnecessary upper-body movement; this in turn will deliver the energy you produce from your legs into a smooth pedal stroke. 

The traditional cycling position requires the core to support you, however it doesn’t really develop your core whilst riding. Without a strong core, a long ride will often finish early or become a real problem due to some kind of pain in your body other than your legs, usually your back or neck. This will normally come from your abdominals, obliques, latissius dorsi and the muscles around the spine quitting before your leg muscles.

Cycling, just like any other sport, should be fun and we should enjoy it. Pain takes the pleasure away from most sports – building a stronger core could help solve many pain issues for cyclists. 

So how can you improve your core? There are a vast array of different core exercises out there and you just need to pick routines that work with you and your lifestyle. The great thing about strengthening your core is that you don’t have to have much time, any equipment (unless you choose) or much room. You can strengthen your core from home if you choose, and by not having to attend fitness classes or a gym you will be quids in. Those savings can be used to put towards equipment for your bike or maybe a cycling tour!

Starting out on a new regime to improve your core? Google ‘exercises for the core for cyclists’ and I think you will be amazed how many different sites, boards etc. there are. If you were to pick just one exercise to do, then it would have to be the basic plank ,also called a hover. The plank will work more than just your abdominals, it also works the glutes and hamstrings, supporting proper posture and improving balance. Here’s how to perform the plank:

  • Lie face down on the floor. Raise the body up with the forearms while balancing the lower body on the toes.
  • Do not sag around the abdominal region. Keep the body as rigid as possible.
  • To hold this position, you will notice that you need to brace and contract the abdominal muscles.
  • Hold for 30 seconds (less if that’s all you can do), lower and then raise again. Do 10 repetitions or less to start with.
  • Alternatively, hold until failure (you flop down), or three minutes, whatever comes first. Do three of these in a set. You will feel the abs burn.
  • Test yourself to find what your maximum time to hold the Plank position is, and then try to beat it as you develop strength. If you can hold for three minutes, you are doing well.Plank by Jaykayfit


(Don’t forget to breathe. If you feel pain in your lower back then you need to lower it and rest as the abdominals have stopped working.)

Remember preparation & prevention are essential for longevity in cycling; if you are planning any of our wonderful cycle touring experiences then being ‘core ready’ will ensure your cycling is so much more enjoyable.


Saddle set up shouldn’t be a pain in the rear

By in Sports & Fitness Comments Off on Saddle set up shouldn’t be a pain in the rear

Our ‘Sports & Fitness’ blogs aim to deliver straightforward and effective advice to increase your cycling enjoyment and performance, and minimise injury risk. As we have said before there is no one remedy for all – humans come in all shapes, sizes and, of course, genders. Our cycling requirements are different too: comfort on long touring holiday rides or performance through events.

SADDLES

There are numerous saddles on the market offering various levels of comfort through innovative and gender specific design. The correct selection is a very personal one, so shop around and try out as many as you can.

Range of different saddles

SADDLE HEIGHT

Firstly ensure the saddle is fastened centrally on the rails and parallel to the floor, this can be checked using a spirit level resting on top of the saddle.

Secondly ensure shoe cleats are set centrally on the ball of the foot or directly on a flat pedal.

As a rough guide, with these details set the saddle height can be set 10cm lower than the inside leg of the rider to achieve a general position from which adjustments can be made.

 How to measure your hip span Angle at the knee whilst cycling should be no greater than 150 degrees

Alternatively, and more accurately, having set, as above, the saddle and cleat arrangement, and sitting on the saddle with the pedal at its lowest point and the knee at full extension, there should be an angle of no greater than 150 degrees at the rear of the knee. If this angle is too great the rider will begin to stretch out to reach the lowest stroke of the pedal, and the pelvis will rock from side to side on the saddle – leading to lower back, ITB and lateral knee pain.

When the pedal is positioned at 3 o’clock and in full flexion there should be an angle of no less than 70 degrees at the rear of the knee. Reducing this angle will result in muscular compression and strain in the pelvis, quadriceps and through the knee, reducing performance with considerable discomfort.

A note of caution when setting saddle height, never extend the seat post beyond the manufacturer’s recommended maximum extension markers. If extra length is required do not compromise, buy a longer seat post and avoid dangerous mechanical failure!

SADDLE POSITION FRONT & REAR

The next consideration is saddle position back and forward. The basic rule of thumb is again to align the centre of the cleat or ball of the foot with the centre of the pedal and then the centre of the knee over this position with the pedal in the 3 o’clock position when looking from the side. This can be achieved with the help of a willing assistant and a plumb line – see below.

Plumb line for optimum saddle position

As with all set-up adjustments they should be small, incremental and tested. Do not continue to ride through pain – trial and error will lead to your optimal position.

Once you have made your adjustments take yourself on a test ride and if necessary make adjustments on the ride testing and re testing, it won’t be wasted time, and it may save you in lost time through injury.

You may find that over time, as your strength develops and flexibility evolves, that your set-up requirements change; this is not unusual so don’t be afraid to change to match them. Recognising your cycling ‘evolution’ and making the right changes will help to minimise injury and maintain comfort on those long days out.

SEAT TILT

The seat should generally be in a neutral position i.e. parallel with the floor, however there may be some circumstances where minimal tilt is preferred but do be careful to consider the following:

Excessive forward tilt may increase pressure in the arms, wrists and hands causing fatigue and numbness as well as tilting your pelvis forward; this may lead to forward movement on the saddle, knee drift over the cleat position and potential knee pain due to increased stresses.

Excessive rear tilt may cause overreaching and increased gripping of bars leading to fatigue in the upper back neck and shoulders. With the pelvis tilting backwards there is the additional risk of low back fatigue also radiating through to the upper back, neck and shoulders.

Saddle angle for optimised comfort

CLEATS

Cleat position, or more generally foot position, can have a great impact with regards to injury, specifically glute and lateral knee pain.

The clearest way to think of this is to visualise your legs as pistons moving up and down in constrained parallel motion, any deviation from this motion can lead to injury. The deviation will be internal or external rotation of the cleat or foot causing misalignment of the joints and musculature of the ankle knee and hip.

You may remember that in a previous blog we discussed the high repetition count of the cycling pedal stroke? This is how minor misalignment leads to injury.

Diagram of foot Diagram of correct cleat, or foot position

We have all ridden behind that person with splayed out knees and wide elbows, with this knowledge of alignment and position think what they would need to adjust…..!

QUICK REFERENCE GUIDE FOR ADJUSTMENT CONSIDERATIONS

PROBLEM
ADJUSTMENT
Rear knee pain Saddle down & forward
Front knee pain Saddle up & back
Lateral knee pain Cleat position & rotation
Front pelvis & hip flexor Saddle down & tilt forward
Numb parts! Saddle tilt forward or changed

REMEMBER THIS CYCLE OF CHANGE

=> SADDLE => BARS => CLEATS =>

EACH SET-UP ALTERED WILL AFFECT THE OTHER, SO BE SURE TO TEST THE NEW POSITION AND CONSIDER THE IMPACT!

For more tips, or to find out more get in touch with Martin Felix on Twitter

Cycling doesn’t have to be a pain in the neck!

By in Sports & Fitness Comments Off on Cycling doesn’t have to be a pain in the neck!

Whether you’re starting out or have spent hours in the saddle it’s likely you will or have experienced neck pain at one time or another. The question is why does this occur and what can we do to elevate it?

Fundamentally the human anatomy is not designed for cycling. We have evolved to stand and move on two feet in an upright position with our spine and neck acting as a shock absorber. So immediately we mount a bike our anatomy is compromised.

Cycling pain in the neck

If you examine the image above you see the cyclist has a forward curvature of the spine (Kyphosis) and, in order to look forward, hyper-extension of the neck – you begin to see why neck pain can occur!
In this position musculature within the upper back, neck and shoulders is driven to work harder to support the imbalanced weight of your head (approx 4.5 to 5kg).
Some of the weight of your upper body is supported through your arms onto the handlebars but even this load can create muscular tension.
We have all seen riders with their shoulders around their ears and arms locked out! All issues which add to the mix.

So what can you do about it?

We discussedGet the right cycle fitting to suit you 
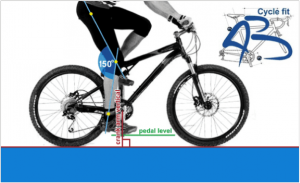
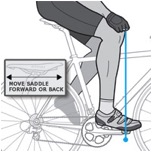
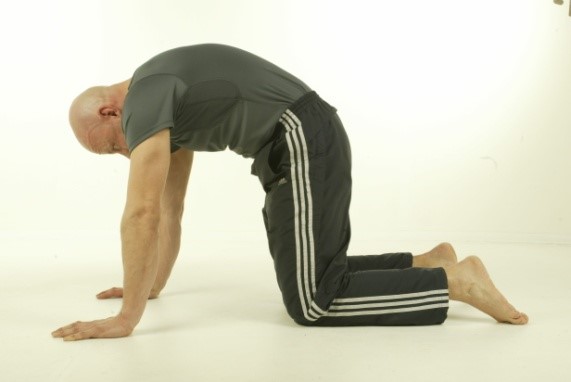
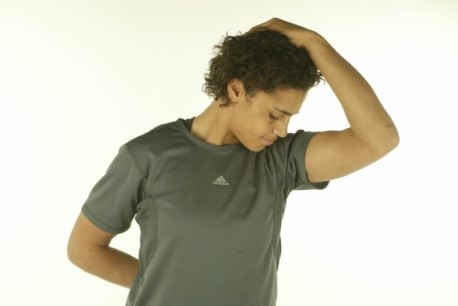
previously the importance of professional bike fittings in minimising injury potential. So now let’s look more specifically at the areas which may help relieve neck pain.
Front end length and height relative to the saddle (E, D, C) are the main considerations in set-up, assuming correct frame size and saddle position (we’ll cover this in detail next time).

Adjusting the cycle handlebars

There is of course no one size fits all position – there are too many variables in individual anatomy and ride requirements, from aggressive racer to holiday tour riding. So when making adjustments to your riding position make them small and incremental, test them over a week or two and correct them where necessary.
First let’s look at length. Front end length (reach) reduction or increase can be achieved by altering the headset length (extension) and/or angle (angle A).

Make the right adjustments to your cycle helps

The second consideration is handlebar height, which can be increased or decreased with the addition or removal of headset spacers.

Thirdly, handlebar type and brake hood position can play a part in poor set-up. Consider optimum handlebar width to be in-line with your shoulder width, unduly large or small bars will also impact the loading into the upper back, neck and shoulders. Brake hoods can offer support in the neutral riding position but incorrectly positioned they will influence the front end length, height, support and reach as previously discussed. Be sure not to set them too high, making braking on the drops unsafe.

Diagram of handlebar measurements

The mechanical changes to front end set-up discussed are relatively straight forward requiring minimal equipment or expertise. However if you are unsure talk to your local bike mechanic.
Finally, try to remain relaxed in your riding position, neck, shoulders, arms and grip soft. Over a long ride you will drift away from this position so check yourself every now and then.
From an exercise perspective the occurrence of neck pain can be minimised through effective strength, stability, flexibility and mobility training through the whole spine. Remember to think about the muscular skeletal interconnections generating the stresses.

MOBILITY:

1. Side Flexions – Walking around on hands

Walking around the hands

2. CAT Spinal Flexion & Extension

Spine flexion cycling exercise    Spine extension

3. Flexibility

Flexible cyclist 1  Flexible cyclist lady 2  Lady flexible cycling 3 Flexible cycling

– Lateral Flexion
– Forward Flexion
– Rotational forward Flexion
– Rotation

4. Stability (core strength):

Planking exercises for cyclists

As you can see there are numerous versions of the plank and its progression. The key thing to remember is alignment, visualise a straight line from your ankle through your knee, hip, on up into you shoulder and neck. Any sag or elevation in the midline and you will have lost the hold.


The Roller is also a useful tool in developing spinal mobility and stability, it has endless uses in self-treatment and is a valuable tool to have in your cupboard. We will revisit the roller throughout my blog.

Using the roller for exercise  Exercising with a roller on your back

Regular sports massage will help improve muscular flexibility and function, so source a recommended Sports Massage Therapist or search the Sports Massage Association (SMA) website. Regular treatment is proven to enhance performance and minimise injury.
One final thing I tend to discuss with clients – the eyes. Sounds odd, but your eyes have a broad range of motion which is often neglected. So do try to use the eyes’ range of motion, not just the neck.
Next time I will look at saddle set-up and position, its impact on the various common injuries and what we can do to elevate them. I hope this article has been of some help and you don’t have to worry about neck pain again!
Remember there are numerous resources on the net dealing with the issues above, so take a look. I often refer to https://www.sportsinjuryclinic.net/

If you would like to discuss further check out my twitter @MFFELIX 1966.
Happy Cycling!

Leaving on Jetplane

By in Road Cycling Holidays, Sports & Fitness Comments Off on Leaving on Jetplane

A sign that reads 'Steve's High Weed Mowing'

One of the riders stood outside a shop.

An empty, winding road that runs alongside a mountain in America.

The hilly terrain taken by riders during a cycling tour of America.

‎Where was I? Ah yes, having cancelled International Rescue we had a jolly evening in a bar/restaurant overlooking the ocean, laughing about how we had spent 3+ hours thinking one of our riders was dead and nearly launched a 25000 dollars/hour search helicopter.
 
Next day was the‎ longest of the trip with lots of hills. Thanks to a return up the biggest of these looking for someone who had, in fact, gone shopping I finished on a magnificent 92 miles and 8000 feet of climb. I was f@?’/d!
 
‎We spent the evening just north of the Golden Gate Bridge and had a pretty passable Indian for tea. As with all Indian meals it ended up costing 50% more than expected – exacerbated by the whole tax, tip, tax on tip nonsense.
 
Tuesday was ride into ‘Frisco day and everyone enjoyed it – everyone except the rider with Fanta pee who, after a 2nd visit to ER and intra-venous ‎anti-biotics conceded that he wasn’t a well man and headed home. We also said a scheduled goodbye to ‘Pierre’ who had a job to keep. Before leaving he managed to suprise me…….I have a fairly high tolerance when it comes to the price of fancy cycling kit but when he proudly told me that he had just purchased a pair of £1000 pedals (that’s right pedals!) I had to have a bit of a sit down.  
 
His other half – ‘Katie’ – is now alone and at our mercy (sinister laugh).
 
Today, for now it is Today, we rode out of SF through the Golden Gate park and started our way down the coast towards Big Sur. The Mustang count is rising almost as fast as the temperature. I LOVE IT!
 
Sent from my BlackBerry 10 smartphone on the EE network.

Night Fever

By in Road Cycling Holidays, Sports & Fitness Comments Off on Night Fever
View of a bay in America from a bike on a sunny day.
A cyclist, before the fever struck, taking a break by the sea and in the sunshine.
Empty coastal road in America against a clear, blue sky.
A road through a forest in America.
An American road sign.
Warning: this blog may contain traces of smugness!
 
So, lovely steaks and a jolly evening in Leggett then the easy 47 miles to Fort Brag on Highway 1. The day started with a bit of a climb then a magnificent 12 mile scream down the other side. The sun was high and it was REALLY spiffy! We are now back beside the Specific and the scenery is really first class – all the better for being viewed from a saddle rather than a love machine.
 
The day was done by 2pm, leaving time for rehydration and a high powered business meeting on the sun terrace. This was briefly interrupted by the emergence of 3 strippers from the room behind us (they MAY not have been strippers but were certainly dressed for the role).  
 
An early evening meal should have been the end of things but one of our riders who had previously reported as being ‘a bit poorly’ was found in his room shivering with a fever and peeing razor blades so we are now in the ER waiting for George Clooney to tell us what is wrong with him. More later!
 
 
Sent from my BlackBerry 10 smartphone on the EE network.