Our ‘Sports & Fitness’ blogs aim to deliver straightforward and effective advice to increase your cycling enjoyment and performance, and minimise injury risk. As we have said before there is no one remedy for all – humans come in all shapes, sizes and, of course, genders. Our cycling requirements are different too: comfort on long touring holiday rides or performance through events.
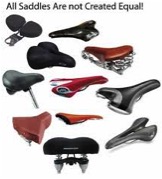
SADDLES
There are numerous saddles on the market offering various levels of comfort through innovative and gender specific design. The correct selection is a very personal one, so shop around and try out as many as you can.
SADDLE HEIGHT
Firstly ensure the saddle is fastened centrally on the rails and parallel to the floor, this can be checked using a spirit level resting on top of the saddle.
Secondly ensure shoe cleats are set centrally on the ball of the foot or directly on a flat pedal.
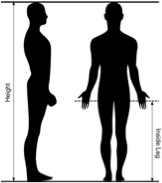
As a rough guide, with these details set the saddle height can be set 10cm lower than the inside leg of the rider to achieve a general position from which adjustments can be made.
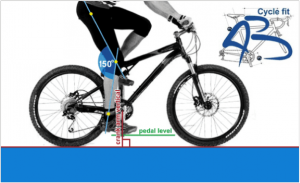
Alternatively, and more accurately, having set, as above, the saddle and cleat arrangement, and sitting on the saddle with the pedal at its lowest point and the knee at full extension, there should be an angle of no greater than 150 degrees at the rear of the knee. If this angle is too great the rider will begin to stretch out to reach the lowest stroke of the pedal, and the pelvis will rock from side to side on the saddle – leading to lower back, ITB and lateral knee pain.
When the pedal is positioned at 3 o’clock and in full flexion there should be an angle of no less than 70 degrees at the rear of the knee. Reducing this angle will result in muscular compression and strain in the pelvis, quadriceps and through the knee, reducing performance with considerable discomfort.
A note of caution when setting saddle height, never extend the seat post beyond the manufacturer’s recommended maximum extension markers. If extra length is required do not compromise, buy a longer seat post and avoid dangerous mechanical failure!
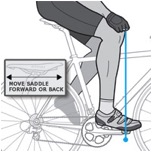
SADDLE POSITION FRONT & REAR
The next consideration is saddle position back and forward. The basic rule of thumb is again to align the centre of the cleat or ball of the foot with the centre of the pedal and then the centre of the knee over this position with the pedal in the 3 o’clock position when looking from the side. This can be achieved with the help of a willing assistant and a plumb line – see below.
As with all set-up adjustments they should be small, incremental and tested. Do not continue to ride through pain – trial and error will lead to your optimal position.
Once you have made your adjustments take yourself on a test ride and if necessary make adjustments on the ride testing and re testing, it won’t be wasted time, and it may save you in lost time through injury.
You may find that over time, as your strength develops and flexibility evolves, that your set-up requirements change; this is not unusual so don’t be afraid to change to match them. Recognising your cycling ‘evolution’ and making the right changes will help to minimise injury and maintain comfort on those long days out.
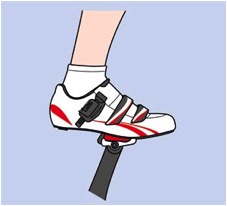
SEAT TILT
The seat should generally be in a neutral position i.e. parallel with the floor, however there may be some circumstances where minimal tilt is preferred but do be careful to consider the following:
Excessive forward tilt may increase pressure in the arms, wrists and hands causing fatigue and numbness as well as tilting your pelvis forward; this may lead to forward movement on the saddle, knee drift over the cleat position and potential knee pain due to increased stresses.
Excessive rear tilt may cause overreaching and increased gripping of bars leading to fatigue in the upper back neck and shoulders. With the pelvis tilting backwards there is the additional risk of low back fatigue also radiating through to the upper back, neck and shoulders.

CLEATS
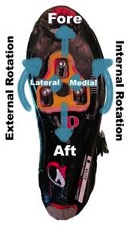
Cleat position, or more generally foot position, can have a great impact with regards to injury, specifically glute and lateral knee pain.
The clearest way to think of this is to visualise your legs as pistons moving up and down in constrained parallel motion, any deviation from this motion can lead to injury. The deviation will be internal or external rotation of the cleat or foot causing misalignment of the joints and musculature of the ankle knee and hip.
You may remember that in a previous blog we discussed the high repetition count of the cycling pedal stroke? This is how minor misalignment leads to injury.
We have all ridden behind that person with splayed out knees and wide elbows, with this knowledge of alignment and position think what they would need to adjust…..!
QUICK REFERENCE GUIDE FOR ADJUSTMENT CONSIDERATIONS
PROBLEM |
ADJUSTMENT |
| Rear knee pain | Saddle down & forward |
| Front knee pain | Saddle up & back |
| Lateral knee pain | Cleat position & rotation |
| Front pelvis & hip flexor | Saddle down & tilt forward |
| Numb parts! | Saddle tilt forward or changed |
REMEMBER THIS CYCLE OF CHANGE
=> SADDLE => BARS => CLEATS =>
EACH SET-UP ALTERED WILL AFFECT THE OTHER, SO BE SURE TO TEST THE NEW POSITION AND CONSIDER THE IMPACT!
For more tips, or to find out more get in touch with Martin Felix on Twitter