As our programme grows we find ourselves visiting more and more new places; in 2016 we will take people cycling in over 20 countries. Many of these trips start or end at a foreign airport and the topic of how best to transport one’s bike is a contentious one. Hard sided cases provide great protection but:
- They are expensive
- Considerable dismantling of the bike is required
- They are very bulky to haul in the support vehicle during the trip
Regrettably, for reason 3 above, we cannot accept hard cases on most of our trips.
Soft bike bags address most of the above problems but the protection they afford is poor. The manufacturers response to this now seems to be the fitting of an internal cage, rendering them as bulky and unacceptable as hard cases.
The bike you purchased was almost certainly manufactured in the Far East, stacked 10 high in a container, hauled by truck to a port, loaded onto a ship, unloaded at the other end and trucked to a distributor. From there it was removed from the container and placed in a warehouse to later be loaded onto another tuck and delivered to your Local Bike Shop. This was all achieved using nothing more than a cardboard box and a bit of careful packing!
Not least because I am a notorious ‘tightwad’, I am a big fan of the humble cardboard bike box to protect my pride and joy when travelling. The key to the whole thing is the ‘careful packing’, which finally brings me to my point. I am shortly off on a cycling adventure (more in the next blog) and I thought it might be worth sharing with you the process of converting my vulnerable and fragile collection of exotic metals into an airline proof parcel.
Step 1: Select Your Box
Bike shops are usually delighted to give away boxes – they have loads and would otherwise have to pay for them to be disposed of. Pop in a couple of weeks before the trip and ask them to put a suitable one aside. If you are feeling generous slip them fiver, it is a good long-term investment.
The crucial trick is to get the optimum size and the most common mistake is to assume that bigger is better. The BEST box is one that is JUST big enough to contain the bike when collapsed as described below. Your bike will fit so snugly that it shouldn’t require any packing materials at all! If necessary do a trial pack as described, measure the result and take these measurements with you to the shop.
Step 2: Remove The Sticky Outy Bits
If you use mudguards remove the front one (the rear should be OK) and remove any racks (you may find there is room for the rack to remain, in which case your box is probably bigger than it needs to be!). Where possible return the removed bolts and washers to their threaded holes – you won’t lose them and you will know what goes where.
Also remove the pedals and the front wheel. Take a moment to apply a little grease to the pedal threads – it will make removing them at the end of the trip much easier.
Take the skewer out of the front wheel and make a bag of the pedals, skewer and any other left-over bits. Tie this bag to the crossbar.
Remove the saddle/seatpost/saddle bag as one unit. Re-tighten the seatpost clamp so it doesn’t fall off.
NOTE: There is absolutely no real reason to let air out of the tyres. Most airlines now know this but some still ask. I have found that the simplest thing is to leave them inflated and just lie when asked about it!
Step 3: Pack The Main Bit
As well as the box, your Local Bike Shop may be able to give you the bits of plastic that the manufacturer uses for shipping. There is a plastic bar that sits in the front fork drop outs and a plastic gizmo that sits on the end of the rear skewer to protect the derailleur. These are not essential – I never use them and have never had a problem.
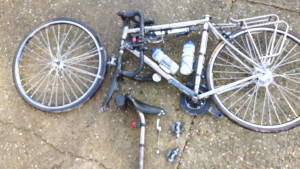
Put the bike in bottom gear (little ring front, bike cog back). This pulls all the vulnerable bits in close to the frame. Remove the handlebars and stem as one piece (this preserves the position of the bars on the stem): undo the bolt/cap on the top of the fork steerer tube, loosen the bolts that clamp the stem to the steerer and pull the stem upwards. Once removed replace the bolt/cap in the top of the steerer.
Turn the forks through 90 degrees.
Suspend the handlebars from the cross bar – this is the only tricky part, see the picture. Depending on the type of bars and frame size the best position may vary. Usually this can be done so that the only parts in contact with the frame are those wrapped in handlebar tape but if you are worried wrap a bit of old towel round the frame first.
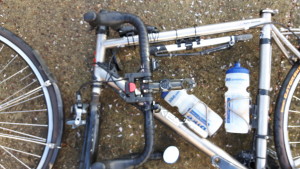
Pick the bike up with one hand, holding the handlebars in position with the other. Hold the box open with a third hand….or get someone to help.
The whole thing should drop in neatly and snugly.
Step 4: Pack The Leftover Bits
The front wheel should fit down one side – you may need to experiment with whether the handlebar hangs on the left or right and exactly where the crank arms rest to create the optimum space.
There should a nice space somewhere for the saddle/seatpost combo. You may want to use a little bubblewrap to keep is secure and protect the frame.
Mudguard can usually be placed around the front wheel.
There should be enough space to tuck in the rack (often just sitting on the rear wheel) and, with a bit of creativity, you will probably still find room for your helmet and cycling shoes.
Step 5: Seal
Packing tape does a good job. Be careful not to tape over the handholds that are usually cut into the sides and end of the box. If you are a ‘belt and braces’ sort of person add a couple of luggage straps. A useful by product of doing this is that you can attach a shoulder strap to them giving you a means of hauling everything to check-in.
I cannot guarantee that a bike packed this way will emerge unscathed but you have given it the best possible chance.